
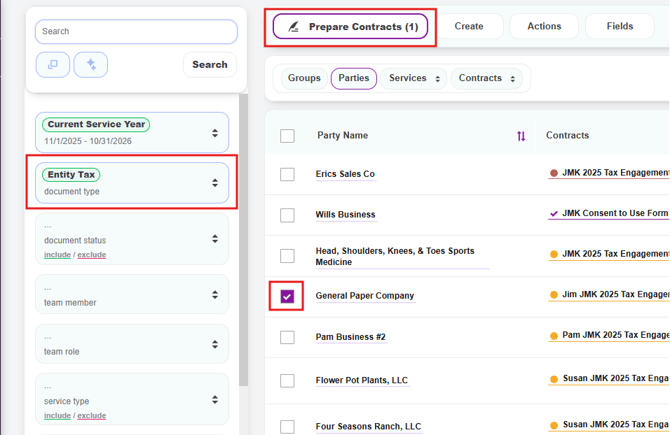
Step 1 — Select Your Client
- From the Parties page, use the filters on the left to narrow your client list (e.g., filter by Document Type or Service Type), or use the search bar at the top to quickly locate a specific client.
- Check the box next to the client you want to create an engagement letter for
- Click Prepare Contracts at the top of the page, then click Prepare Contracts (1)
Tip: You can select one client and choose Prepare Contracts (1) to create a letter for just that client, or use Prepare All Contracts to create letters for all filtered clients at once.
Step 2 — Select Your Template
- A template selection screen will appear showing all available Company Templates
- Scroll through the list to find the correct template for your engagement type (e.g., ERISA Full Scope, Review, Business Tax, etc.)
- Click directly on the template title to open the draft engagement letter
- Or, if you need to select multiple templates for the same client, check the box next to each desired template and click Preview >> in the top right corner to open them together
Note: Each template in the Package column shows which document will automatically be attached (e.g., Appendix A - Terms & Conditions). You do not need to select the Terms & Conditions separately.

Step 3 — Fill In the Client Fields
When the draft engagement letter first opens, the left panel displays a summary view of the engagement, including the client name and email, any assigned team members and their roles, the selected templates, and any attachments.
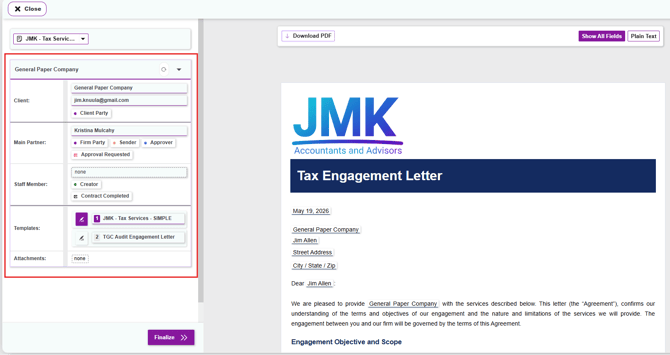
To begin filling in client information:
- Click the client name or any client field directly in the drafted engagement letter on the right
- The left panel will open to show the client fields applicable to that specific template, displayed in the order they appear in the letter
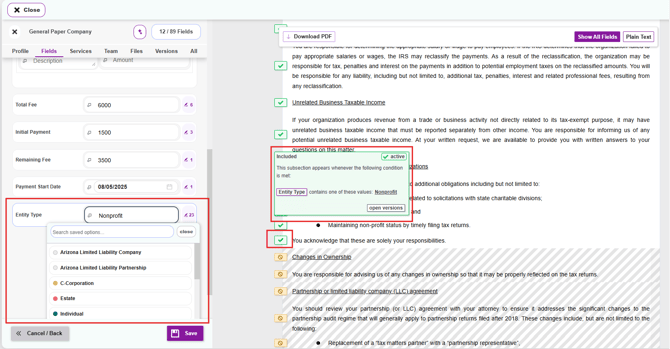
- Click on a field name in the left panel to activate it
- Type in the value or select from the saved options dropdown if one is available
- Watch the engagement letter on the right update in real time as you fill in each field

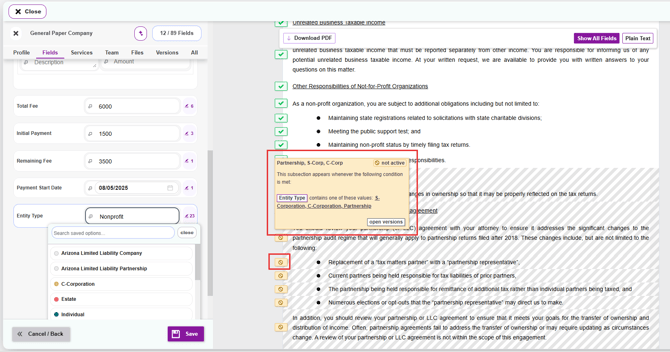
Section status indicators: Certain sections in the engagement letter are conditional — meaning they only appear if specific criteria are met. These conditional sections display an icon to the left indicating their current status:
- Green checkmark: The section is active and will appear in the final letter sent to the client
- Yellow square with a red circle and line through it: The section is inactive and will not appear in the final letter. Inactive sections also appear greyed out in the draft so you can easily identify them
Tip: Hover over either the green or yellow icon to see the condition logic behind that section, including which values trigger the section to become active or inactive.
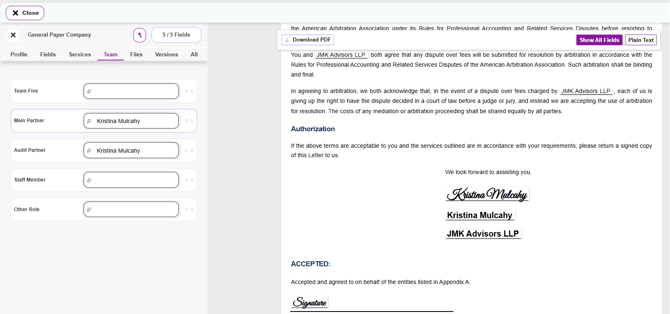
Step 4 — Assign Your Team Member
Note: Every firm configures their team member roles differently, including custom routing and notification workflows for letter creation, approval, and delivery. The steps below describe the general flow — your firm's specific role names and routing rules may vary.- Click the Team tab at the top of the left panel
- In the Partner field, select the partner responsible for this engagement (e.g., Kristina Mulcahy)
- Optionally assign a Manager and Staff member
- The partner's name, credentials, and signature will automatically populate in the letter's closing signature block
Tip: If a staff member or admin is drafting the letter on behalf of a partner, assign the staff member as Creator and the partner as Approver with Approval Requested checked. The partner will receive an email to review and approve, and the staff member will be notified once approved.
Step 5 — Review the Draft Letter
- Click Save to save all your entries
- Click Plain Text in the top right of the letter to see the clean final version without field highlights
- Scroll through the full letter to confirm all information looks correct
- Click Show All Fields to return to edit mode if any changes are needed

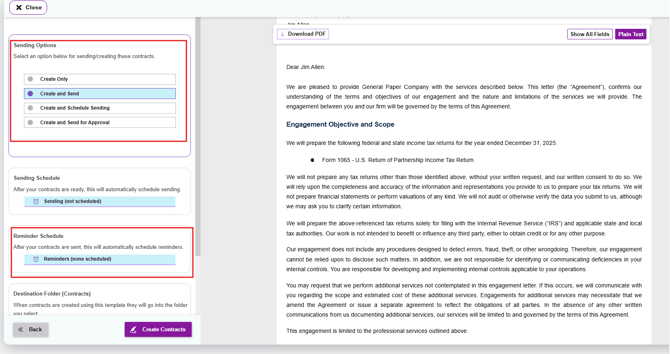
Step 6 — Finalize and Send
- Click Finalize
- Choose one of the following:
- Create Only — creates the contract and saves it in Knuula without sending it to anyone. Use this if you want to save your progress, review the letter further, or wait before sending
- Create and Send — sends directly to the client for signature
- Create and Send for Approval — routes the letter to the assigned partner for review and approval before it goes to the client
If applicable, set up a Reminder Schedule to automatically follow up with the client if the letter has not been signed. You can set reminders at specific intervals (e.g., 3 days, 7 days after sending) so you don't have to manually track outstanding signatures
Step 7 — View Your Finalized Engagement Letter
Once the letter has been sent, you can track and access it at any time from the Contracts page:
- Click Contracts from the left sidebar navigation
- Your engagement letter will appear in the list with its current status (e.g., pending signature, completed)
- Use the filters on the left to search by client name, document status, team member, or document type to locate a specific letter
- Click on the letter to open it, download a PDF copy, or take any further action
Important Notes Before You Finalize
-
The letter is not officially created until you click "Create Contracts." Until you complete the finalize step by clicking Create Contracts (or Create and Send / Create and Send for Approval), the drafted letter will not appear in Knuula as a created contract. Closing out before this step means the letter itself has not been drafted or saved in the system.
-
However, any updates you made to client information will still be saved back to the client's Party record — as long as you clicked the Save button before closing out. So your client data is preserved even if the letter itself isn't yet created.
-
-
The "Download PDF" preview is not the final version your client will see. If you click Download PDF while drafting, you'll notice a dotted line at the top of each page labeled "PDF Preview." This indicates that the file is a preview only — it is not the final formatted version your client will receive.
A few things to keep in mind:
- Most clients will view and sign their engagement letter directly in Knuula, where the letter is presented as a web-based document — one continuous page with no page breaks. This looks noticeably different from the PDF preview.
- Because Knuula generates web-based contracts, converting the letter to PDF can cause minor formatting differences compared to what you and your clients see in Knuula.
- Use the Plain Text view inside Knuula (covered in Step 5) if you want the cleanest representation of what the client will actually see online.